“No remote Desktop License Server available on RD Session Host server 2012 (event id 1130).”
Error in RDS 2012:
EventID: 1130
Source: TerminalServices-RemoteConnectionManager
The remote session was disconnected because there are no Remote Desktop client access licenses available for this computer. Please contact the server administrator.”
Source: TerminalServices-RemoteConnectionManager
The remote session was disconnected because there are no Remote Desktop client access licenses available for this computer. Please contact the server administrator.”
Cách chữa theo các bước sau:
Bước 1. Xóa key license trial của RDSH cũ:
Hãy xoá tham số này trong Regedit “REG_BINARY in”
HKEY_LOCAL_MACHINE\SYSTEM\CurrentControlSet\Control\Terminal Server\RCM\GracePeriod
(hãy để phân quyền ở mức ownership để có thể xoá được key này.)
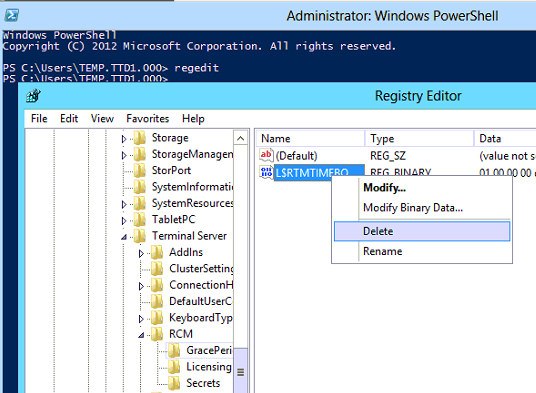

Sau đó khởi động lại tất cả Remote Desktop services.
Chú thích: bây giờ nếu bạn không thể xoá được hoặc chưa xoá được key này
Bạn cần thay lại quyền ownership cho Admin users và có full control để xoá key đó.
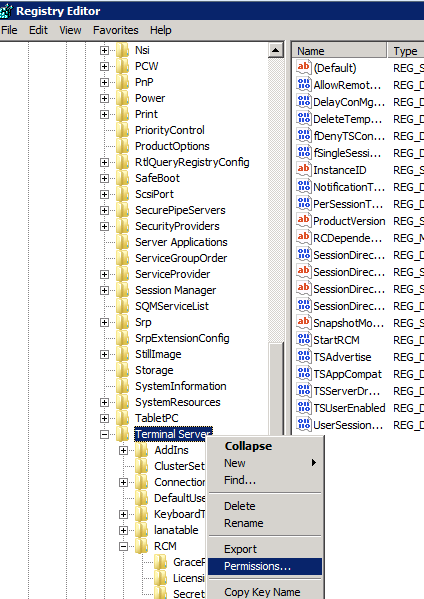
Bấm vào key cần ownership . Chọn menu Edit bấm Permissions> bấm tiếp Advanced và sau đó bấm Owner tab.
Nhóm chọn Replace owner on subcontainers and objects và bấm new owner, và sau đó bấm OK.
Bước 2. Kiểm tra các cấu hình RDP Session Host Server Configuration:
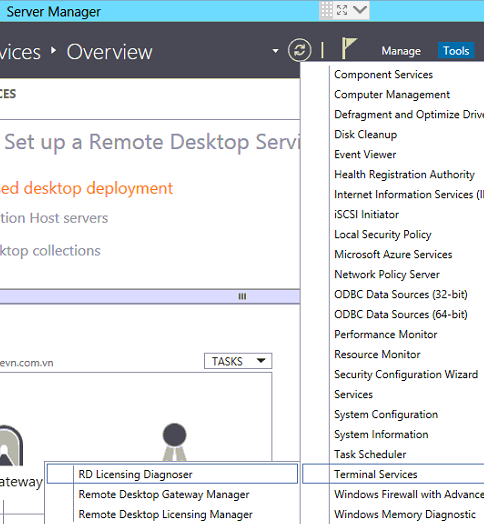
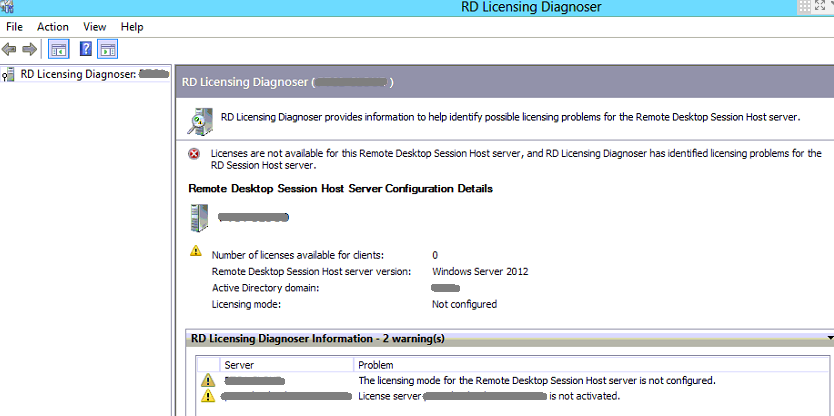
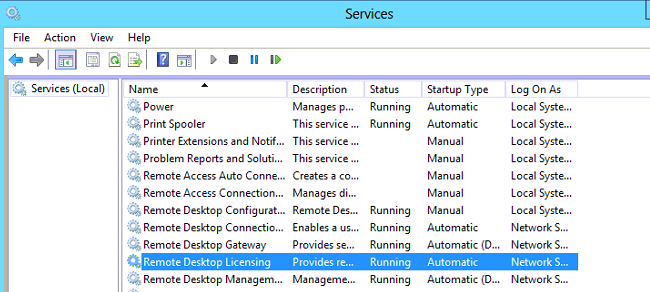
Bước 3. Kiểm tra các RD Service, có thể restart service nếu không users kết nối:
Bước 4. Xóa thông báo TS theo lịch trình của Windows:
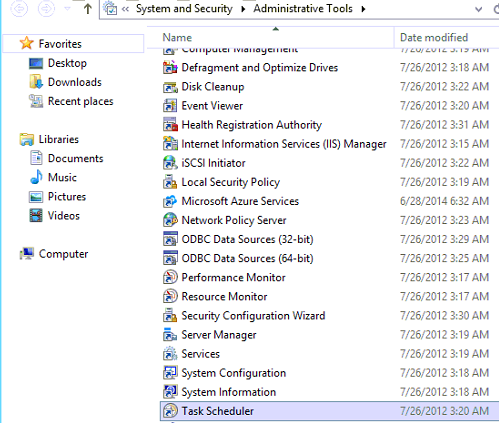
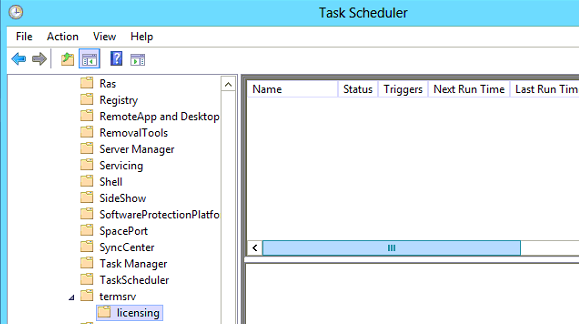
Bước 5. Kiểm tra xác nhận lại RDSH còn kết nối License:

Bước 6. Xóa tên máy chủ và tạo lại License mới thông qua kiểu Device:
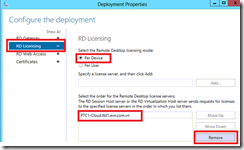
Bước 7. Kiểm tra RemoteApp từ máy trạm và phát hiện lỗi remote:

Bước 8. Khởi động lại máy chủ RDSH:
Khởi động lại máy chủ và
Mở Server Manager lại kiểm tra các Services RDP
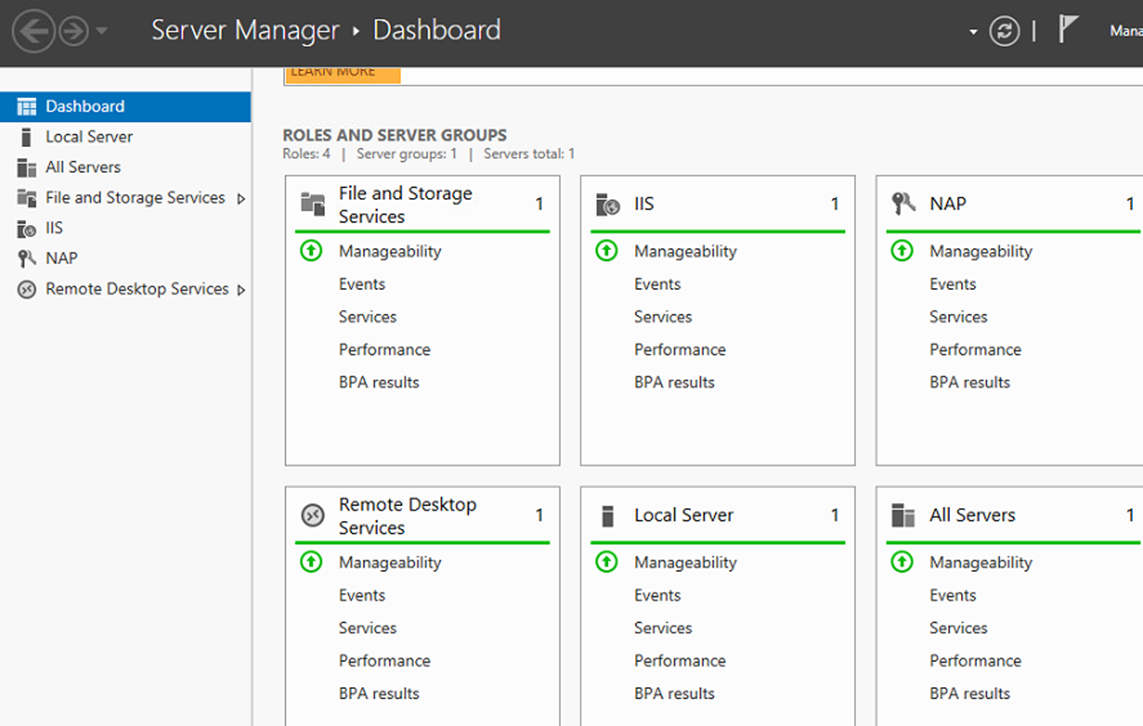
Nếu thấy lỗi services thì chọn nút phải chuột bật start /restart lại các services đó.
How to restrict users from accessing local drives of an RD Session Host server while using RemoteApp programs
I would like to discuss a method that an administrator can use to keep users from storing files in public folders and scattering files randomly throughout a virtual machine pool or Remote Desktop Session Host (RD Session Host) server farm, while using Remote Desktop Services and RemoteApp programs. (Note: an “RD Session Host server” was formerly called a “terminal server” in Windows Server 2008.)
Currently, when a user creates an RDP session or a RemoteApp program, they can see, and in some cases transverse, drives C and D of the RD Session Host server. They can also save anything on the desktop, which might look like their personal desktop, but it’s actually the desktop of the RD Session Host server.
Restrictions will disable Libraries and Favorites and will hide or restrict users or a group of users from accessing and viewing any drives on the RD Session Host server. Users will be provided with an error message even if they use the UNC path to access the drives.
The primary reason to remove Favorites and Libraries and access to drives is because they contain mostly accessed locations on a system, so in the case of the RD Session Host server, this includes the desktop, downloads, recent places, etc. It is recommended that a user not save any documents to these locations.
Removing Favorites and Libraries
You must perform these modifications on the RD Session Host server. You can use the Registry to make these changes.
Using the Registry (applies to all users including the administrators)
Note: Back up the key first and take ownership of the ShellFolder before changing the value of Attributes.
1. For Favorites, the key is:
[HKEY_CLASSES_ROOT\CLSID\{323CA680-C24D-4099-B94D-446DD2D7249E}\ShellFolder]
“Attributes”=dword:a0900100
Changing a0900100 to a9400100 will hide Favorites from the navigation pane.
“Attributes”=dword:a0900100
Changing a0900100 to a9400100 will hide Favorites from the navigation pane.
2. For Libraries, the key is:
[HKEY_CLASSES_ROOT\CLSID\{031E4825-7B94-4dc3-B131-E946B44C8DD5}\ShellFolder]
“Attributes”=dword:b080010d
Changing b080010d to b090010d will hide Libraries from the navigation pane.
“Attributes”=dword:b080010d
Changing b080010d to b090010d will hide Libraries from the navigation pane.
Hiding/Preventing Access to Drives
You can use Group Policy settings to hide and restrict access to drives on the RD Session Host server. By enabling these settings you can ensure that users do not inadvertently access data stored on other drives, or delete or damage programs or other critical system files on drive C.
The following settings are located in the Group Policy Management Console under User Configuration\Policies\Administrative Templates\Windows Components\Windows Explorer:
- Hide these specified drives in My Computer. You can remove the icons for specified drives from a user’s My Computer folder by enabling this setting and using the drop-down list to select the drives you would like to hide. However, this setting does not restrict access to these drives.
- Prevent access to drives from My Computer. Enable this setting to prevent users from accessing the chosen combination of drives. Use this setting to lock down the RD Session Host server for users accessing it for their primary desktop.
Applies to:
- Windows Server 2008 R2
- Windows Server 2008
- Windows Server 2003
Other Group Policy Settings for Additional Security
You can also enable the following Group Policy settings at User Configuration\Administrative Templates\Windows Components\Windows Explorer:
- Hides the Manage item on the Windows Explorer context menu — Enabled
- Remove Hardware tab — Enabled
- Remove “Map Network Drive” and “Disconnect Network Drive” — Enabled
- Remove Search button from Windows Explorer — Enabled
- Disable Windows Explorer’s default context menu — Enabled
- Remove Run menu from Start Menu — Enabled
Applies to:
- Windows Server 2008 R2
- Windows Server 2008
- Windows 7
- Windows Vista
- Windows XP
Remove Network icon from explorer and Common File Dialog.
Note: This solutions is based upon personal experience with Windows Server 2008R2 SP1. This test case is comprised of one Terminal Server and this same Windows Server 2008R2 SP1 server editing the Group Policy on a Windows Server 2003R1 SP2 Domain Controller. (Because the Group Policy Preference is only available via Windows Server 2008)
Windows Server 2008R2 is 64-bit only it contains 32-bit compatibility for backwards compatibility reasons. This, sometimes, leads to duality within the system. For example there are two Program File directories. One ‘normal’ one and one x86 version. This is the same within the registry, but most of the time you won’t notice this because most program’s don’t really care where this data is stored. Unless you are named: Common File Dialog…
The trick, part 1:
To get rid of the Network icon from Windows Explorer edit this in the server’s registry:
Path: HKEY_CLASSES_ROOT\CLSID\{F02C1A0D-BE21-4350-88B0-7367FC96EF3C}\ShellFolder
Key: Attributes
Change this hex value: “b0040064” (without quotes!)
To this value: “b0940064” (also with quotes)
This first part is, in the 32-bit world, the solution for the Windows Explorer ánd the Common File Dialog. But in the 64-bit world you need another registry key edited. This is basically the same key, but in the Wow6432Node ‘folder’ within the registry. This is the backwards compatibility mode within the registry I was talking about before. Click here to learn more about this Wow6432Node and it’s uses.
The trick, part 2:
To get rid of the Network icon from the Common File Dialog edit this in the server’s registry:
Path: HKEY_CLASSES_ROOT\Wow6432Node\CLSID\{F02C1A0D-BE21-4350-88B0-7367FC96EF3C}\ShellFolder
Key: Attributes
Change this hex value: “b0040064” (without quotes!)
To this value: “b0940064” (also with quotes)
(Note, this screenshot is made from Windows 7 Ultimate, but the keys are the same because the codebase for Windows 7 and Windows Server 2008R2 are the same.)
Chúc các bạn thành công !


إرسال تعليق