DVR HTTP Live Streaming

DVR can be (and actually already is) configured for both HTTP Dynamic Streaming (HDS) as well as HTTP Live Streaming (HLS). The configuration for HLS is a bit more involved, so we’ll tackle the configuration for live HDS streams first. I’ll be walking through the configuration of Adobe Media Server (AMS) 5+.
Configuring DVR for HDS
HDS DVR is controlled using a set-level manifest file. A set-level manifest file is an XML file that provides information about where to play media back from as well as other configuration information for the stream. The Set level manifest file contains some or all of the following:
- A base URL.
- One or more <media> nodes that point to the media to be played.
- Information about DVR.
Below is an example of a set level manifest file for a single bitrate:
xmlns="http://ns.adobe.com/f4m/2.0">
    http://localhost/hds-live/livepkgr/_definst_/liveevent/
To specify dvr information for this live HDS stream, we add a node that contains a windowDuration attribute.
xmlns="http://ns.adobe.com/f4m/2.0">
    <dvrInfo windowDuration="30"/>
    http://localhost/hds-live/livepkgr/_definst_/liveevent/
Setting the amount of recorded content
The value for windowDuration can be set to -1, meaning all of the recorded content is available, or it can be set to a number greater than zero (don’t set windowDuration to 0, it can cause problems). This number represents the number of minutes of recorded content, in minutes, that is available to the client to seek through. By Default Adobe Media Server keeps 3 hours of content. You can configure the amount of content the server keeps in the Application.xml or the Event.xml files.
To configure the disk management options in the Application.xml file specify a value in hours for the <DiskManagementDuration> node. You can also use decimal values to specify minutes as in the example below :
<Application>
    <HDS>
        <Recording>
            <FragmentDuration>4000</FragmentDuration>
            <SegmentDuration>16000</SegmentDuration>
            <DiskManagementDuration>4.5</DiskManagementDuration>
        </Recording>
    </HDS>
</Application>
To specify the disk management options in the Event.xml add the the node with the same parameters similar to the example below:
<Event>
    <EventID>liveevent</EventID>
    <Recording>
        ...
        <DiskManagementDuration>4.5</DiskManagementDuration>
    </Recording>
</Events>
Creating the set-level manifest file
A tool to generate set-level manifest files is installed with AMS. Known as the F4M Configurator, you can find it in the {AMS_INSTALL}/tools/f4mconfig/configurator directory. I’ve written another article on using the F4M Configurator, so I won’t go into that here. But, feel free to review that article – Using Adobe’s F4M Configurator Tool. Using the set-level manifest above we now have a manifest file that we can work with.
xmlns="http://ns.adobe.com/f4m/2.0">

    http://192.168.1.113/hds-live/livepkgr/_definst_/myliveevent/
Now that we have configured the amount of recorded media and created a set-level manifest file. We can test DVR for our live stream in a player.
- Upload the set-level manifest to a web server. I’ve uploaded mine to http://thekuroko.com/samples/hds/myliveevent.f4m
- Go ahead and start up your live stream.
- Then open the following URL: http://www.osmf.org/dev/2.0gm/setup.html
- Enter the path to your set-level manifest as the value for “src” in the “FlashVars” section.
- Set the “Stream Type” to “dvr”.
- Click the “Preview” button at the bottom of the form.
Your stream should play, but because we’ve added the <dvrInfo> node, the progress bar should reflect that you can now see back into the content.
Without the dvrInfo:
With the dvrInfo:
Configuring DVR for HLS
DVR for HLS is configured in a similar way to HDS. Except you don’t need the set-level manifest.
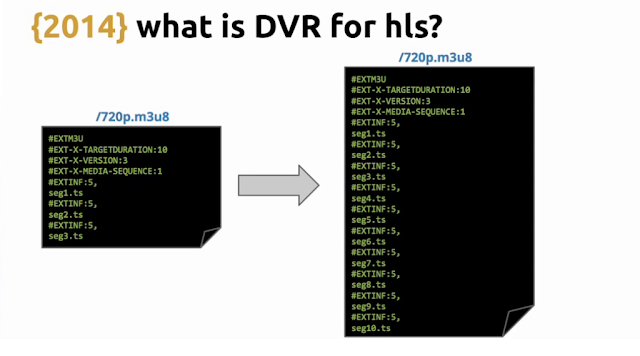
The DVR or sliding window can be configured at an event level in the Event.xml file, at an application level in the Application.xml file, or at a server level in the Apache httpd.conf file.
Configuring at the event level
- Open the Event.xml file in the {AMS_INSTALL}/applications/livepkgr/_definst_/myliveevent to configure the sliding window for the event named myliveevent in the livepkgr application.
- Update the Event.xml with the following XML to create a 1 hour sliding window:
<HLS>
    <MediaFileDuration>8000</MediaFileDuration>
    <SlidingWindowLength>450</SlidingWindowLength>
</HLS> - The MediaFileDuration sets the length of each .ts segment in milliseconds and the SlidingWindowLength value configures the number of .ts segments to keep around.
- The resulting Event.xml file should look like:
<Event>
  <EventID>myliveevent</EventID>
  <Recording>
    <FragmentDuration>4000</FragmentDuration>
    <SegmentDuration>400000</SegmentDuration>
    <DiskManagementDuration>1</DiskManagementDuration>
  </Recording>
  <HLS>
      <MediaFileDuration>8000</MediaFileDuration>
      <SlidingWindowLength>450</SlidingWindowLength>
  </HLS>
</Event>
Configuring HLS at the application level
- Open the Application.xml file in {AMS_INSTALL}/applications/livepkgr
- Add the same XML node set as the event level configuration to the Application.xml file.
- The resulting file should resemble the following:
<Application>
    <StreamManager>
        <Live>
            <AssumeAbsoluteTime>true</AssumeAbsoluteTime>
        </Live>
    </StreamManager>
    <HLS>
        <MediaFileDuration>8000</MediaFileDuration>
        <SlidingWindowLength>450</SlidingWindowLength>
    </HLS>
</Application>
Configuring HLS at the server level
- Open the httpd.conf file in {AMS_INSTALL}/Apache2.2/conf (If you are using a non-default Apache install, your httpd.conf file will be in a different location)
- Find the Location directive for “hls-live” & add/update the value for HLSMediaFileDuration to be 8000 and HLSSlidingWindowLength to be 450. This will set a sliding window duration of 1 hour for all live HLS streams. By default the sliding window is set to 48 seconds (6 * 8 second .ts files).
    HLSHttpStreamingEnabled true
    HttpStreamingLiveEventPath "../applications"
    HttpStreamingContentPath "../applications"
    HLSMediaFileDuration 8000
    HLSSlidingWindowLength 450
    HLSFmsDirPath ".."
    HttpStreamingUnavailableResponseCode 503
    ...
Playing back the HLS content
There are quite a few ways to test the HLS content:
- Safari on a Mac with Flash disabled.
- Quicktime Player
- From the main menu choose “File” -> “Open Location”
- Then type in the URL to the .M3U8 – Ex: http://192.168.1.114/hls-live/livepkgr/_definst_/myliveevent/mylivestream.m3u8
- VLCUse an iOS device – either setup an HTML player like VideoJS or MediaElementJS or open the .M3U8 UR directly. Currently this is the only way I was able to use the sliding window. The stream will playback in the other players, but the control bar will not reflect the available content to seek through.
- From the main menu choose “File” -> “Open Network”
- Then type in the URL to the .M3U8 – Ex: http://192.168.1.114/hls-live/livepkgr/_definst_/myliveevent/mylivestream.m3u8
Resources
- Disk management: http://help.adobe.com/en_US/flashmediaserver/devguide/WSeb6b7485f9649bf23d103e5512e08f3a338-8000.html#WSec225f632fa00875-23954b6f1300b641158-8000

Świetnie napisane. Pozdrawiam serdecznie.
Trả lờiXóaĐăng nhận xét